Many apartment buildings do not have gas pipes that are designed to connecting gas stove. As an alternative, a separate electrical outlet is provided for connecting devices powered by the mains. If you have an apartment with this device connection diagram, then you definitely need to know how to connect an electric stove. Of course, it is better to entrust this work to a professional, especially if you have not had to install such devices before.
First you need to choose a place
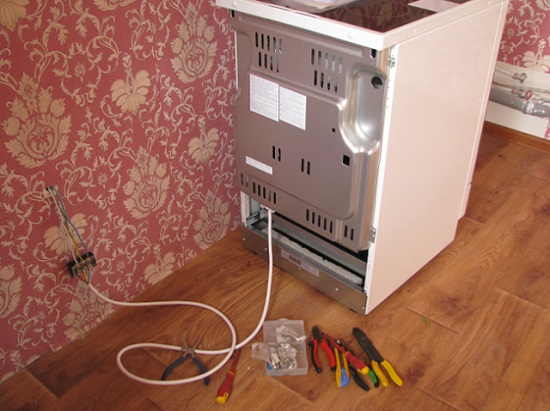
Site preparation
Before you start connecting the electrical network, you should first select a place to install this device. In order for the device to provide maximum convenience and fit perfectly into the kitchen space, the following recommendations should be considered when installing it:
- installation requires a place with a flat surface. It is important that in the process of adjusting the legs of the product it was possible to ensure a stable position relative to the horizontal;
- the length of the wire should be optimal. It should provide the opportunity for free movement of the device from the wall without disconnecting;
- It must be borne in mind that the device is able to warm up to 100 degrees Celsius. For this reason, it should not be installed next to the refrigerator;
- if the appliance will be built into the design of a kitchen set, it is first worth protecting all surfaces made of plastic. The fact is that when the plate is heated, they can deform or melt;
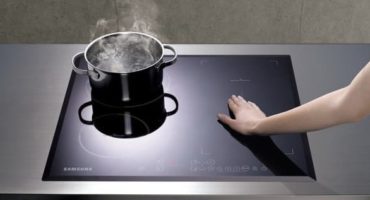
- if an induction cooker is installed in the kitchen, then do not place other electrical appliances next to it. Its electromagnetic field will affect them, which will lead to a visible deterioration in the functioning of technology.
Main requirements
The connection of the electric stove must be carried out correctly, its normal functioning depends on this. To do this, you must follow the important rules for installing electrical household appliances. If you have never made the installation of these devices, then it is better to entrust this task to professionals. The fact is that with self-assembly, you can lose the right to warranty service in a service center.
Before starting the process of connecting the device, it is recommended to find out the power indicator. It is worth identifying which network you want to connect the device to. Typically, many apartments and private houses are equipped with a common single-phase wiring network with a capacity of 220 V. In rare cases, there are lines with a three-phase device.
To properly install devices for three-phase lines, it is worth observing some important features when installing them:
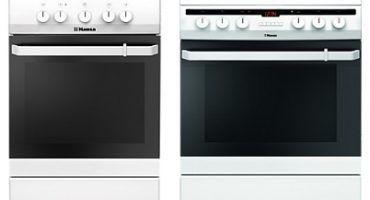
- Some models of desktop electric stoves and individual ovens (for example, Gorenje, Hansa) have a power rating of less than 3000 watts. These devices are connected with a 13 A plug and a socket. Also for connection, you can use the connecting device, which is equipped with a fuse;
- devices with a power rating of more than 3000 watts may be on sale. It is recommended to connect them using a separate wiring that goes directly to the electrical panel. This type of wiring is called radial networks.
When connected to a 380 V network, an outlet is usually not used, this increases the level of security. To do this, lengthen the power circuit, as well as install a fuse. But it is advisable to consult with an experienced electrician first. He will advise whether it will be necessary to replace the traditional mini-machine with a fuse.
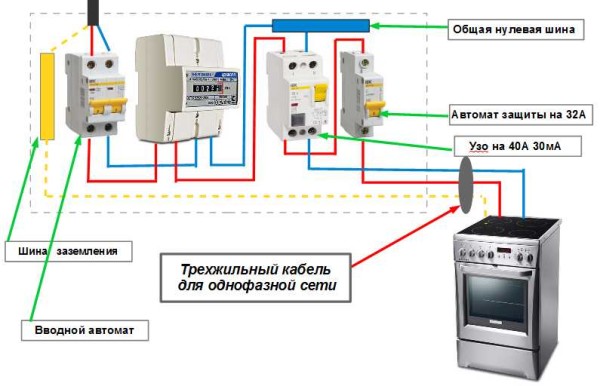
Electric connection diagram
Be sure to install a separate circuit breaker with a fuse in the electrical panel, it can also be replaced with an available free block. During the installation of the circuit breaker, you need to make sure that the fuses are tubular.
You also need to choose the right cross-sectional size for connecting to the radial network. It may depend on the type of plate:
- for plates that work with power up to 13.5 kW, it is worth choosing a wire with a cross section of 4 square meters. mm;
- for plates with a power of up to 18 kW, wires with a cross section of 6 sq. mm are suitable.
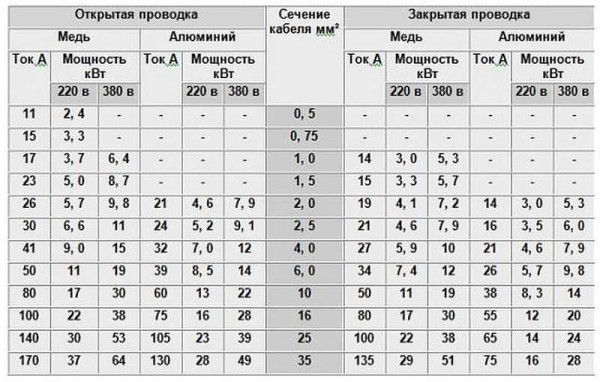
Conductor cross section table
The protection function must be performed by a 30 amp fuse or a 32 amp mini-circuit breaker. Wiring is suitable with a three-wire structure. One of the cores should be used for grounding.
Features of connecting to a radial network
If you need to connect the product to a network with a radial device, then you should follow a certain scheme. She will help to make a connection with her own hands. To do this, you need to follow the important recommendations:
- the connection block must be installed at a distance of two meters from the stove. The approach area should not have restrictions and obstacles - this is the main component of security. During this process, a box with a mounting or hidden design is required;
- if a metal box is used, then it needs to penetrate a recess at the base of the wall;
- The oven and burner sections must be connected using separate wires. Their cross-sectional size should correspond to the dimensions of the main wire, which leads to the electrical panel;
- the terminal box must be mounted on the wall surface at a level of 60 cm from the floor. A wire can be used to connect the box and the connection block;
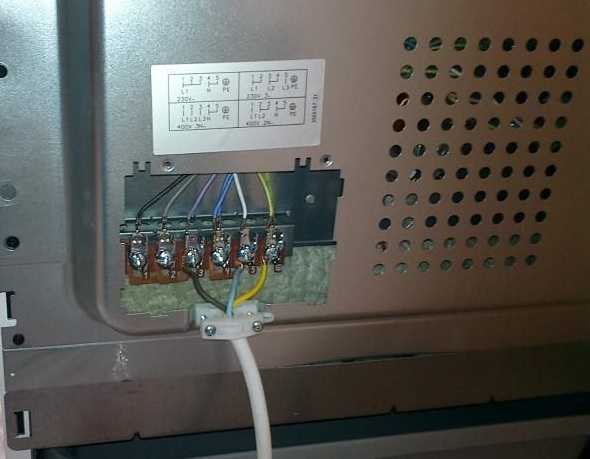
Terminal block for connecting an electric cord
- laying the wire from the electrical panel is the shortest way. It should be placed in a recess that is made in the wall surface. This will help to hide all wires that can greatly spoil the interior design;
- after summing up all the wires, you can start stripping the ends of each core;
- usually in the mechanism of the unit special terminals are installed with which to mount. The terminals marked “mains” must connect the network. The fixing of cables from the product should be done to the components marked “load”;
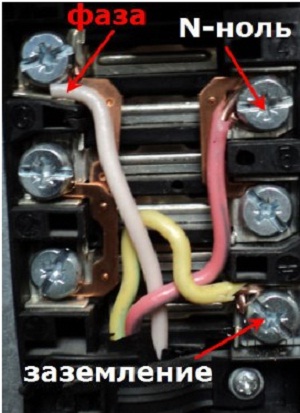
- the phase is fixed to terminal L, her veins are red. Neutral with a black color are attached to the terminal marked with the letter N. And grounding must be attached to the elements with the letter E. The grounding is carried out using a cambric with yellow-green color, it must be fixed to the wires;
- the circuit diagram for the exact connection of the electric stove is described in the operating manual. Be sure to install all important rules when installing the device;
- in the terminal box, you need to connect the wires from the unit and cable.

Conductor elements should be equipped with contact plates
How to install using connecting devices
You can connect a simple electric stove using a connecting device. The process is performed in two ways.
Wiring diagram
If the output of the circuit breaker block is made on a spare block of the electrical panel, it is important to correctly distribute the wires during connection:
- a vein with a red tint should be connected to the block itself, which is a phase;
- the black core must be connected to the neutral terminal;
- The grounding cable must be connected to the terminals marked with grounding. This terminal is usually marked with yellow-green cambric.
There is another connection method. It should be done through the switch mechanism, which is equipped with a fuse. Its fastening should be made near the electrical panel. Everything is fixed with screws.
The cables from the device must be connected to the terminals using the following diagram:
- the core, which has a red insulation, must be attached to the phase;
- black elements are connected to elements marked N;
- the ground conductor must be connected to the ground terminal; it has a yellow-green cambric.
The meter is connected to the circuit breaker device. This will require two stranded wires with double insulation. Section size should be 16 square meters. mm A smaller cross section is allowed - 10 square meters. mm, but at the same time, the connection can be made from thin pieces of wire.
The wire with black insulation is attached to the terminal of the switchboard and switch marked N. The red conductors must be attached to the phase marked L. The grounding elements must be fixed. It should consist of a wire with a multicore structure, it is attached to the terminal in the corresponding zone of the electrical panel. She usually has a cambric with a yellow-green color.
How to install different schemes
During installation, in which the outlet is used, everything is quite simple. To do this, you need a special cable that is designed specifically for connecting the product. It must have a special connector on the outlet, and must also be equipped with a plug (RSh-VSh). It can be intended for postings with a hidden or external device.
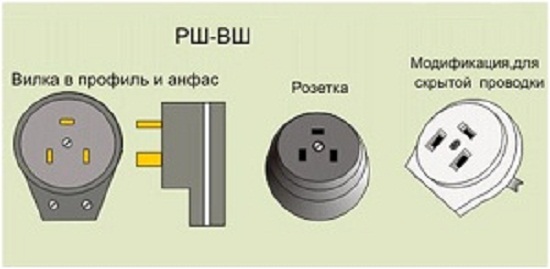
Types of sockets and plugs
It is worth paying attention to the fact that electric stoves can have different voltages - 220 V and 380 V. Be sure the manufacturer of the household appliance must indicate the type of connection diagram, which should ensure the correct supply of network wires to the device terminals. Sometimes on the surface of the back wall of the product is a schematic image, or it is indicated in the instructions.
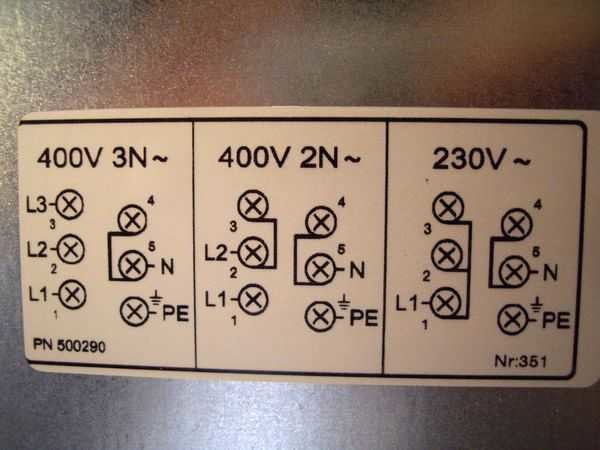
Drawing scheme on the device
It is also worth paying attention to the important notation that will be required when installing the device:
- L1, L2, L3 - clamps for phases;
- neutrals are marked with the letter N;
- phase itself - 1, 2, 3;
- neutral - 4 and 5.
Single phase connection
When connecting an electric stove using different schemes, it is necessary to take into account the important features from the list below:
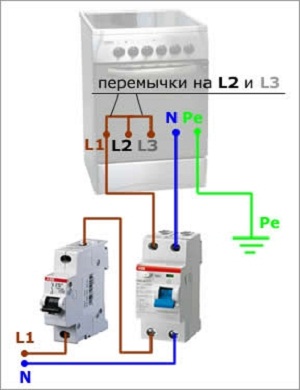
- electric stoves, which are intended for inclusion in a single-phase network, have a special jumper. It is initially provided by the manufacturer between the phase elements;
- if a three-phase connection of an electric stove is made, then the jumper must be removed. In this case, the sequence of connection of wires with single-phase clamps does not matter at all;
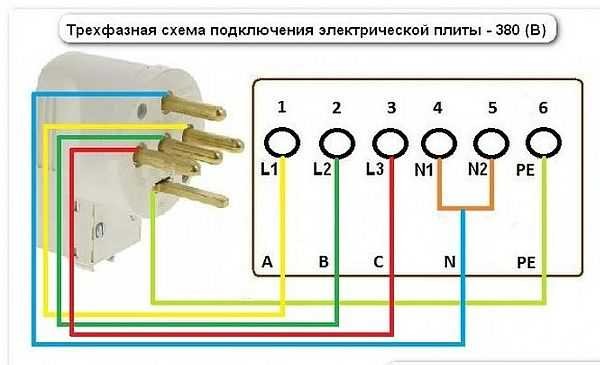
Scheme of connecting an electric stove to a three-phase network
- when making a two-phase connection, a jumper must be installed between the terminals under numbers 1 and 2. One phase is connected. But the second phase should be fixed with a clamp.
Connecting an electric stove is a rather complicated process, during which it is important to follow the correct sequence. In this matter, knowledge and experience will be required, so if you have never had to do this yourself, it is better to entrust the process to professionals. Subject to all the rules, principles, recommendations, the electric stove will be installed correctly, which means its use will be comfortable.